Last updated: April 2026
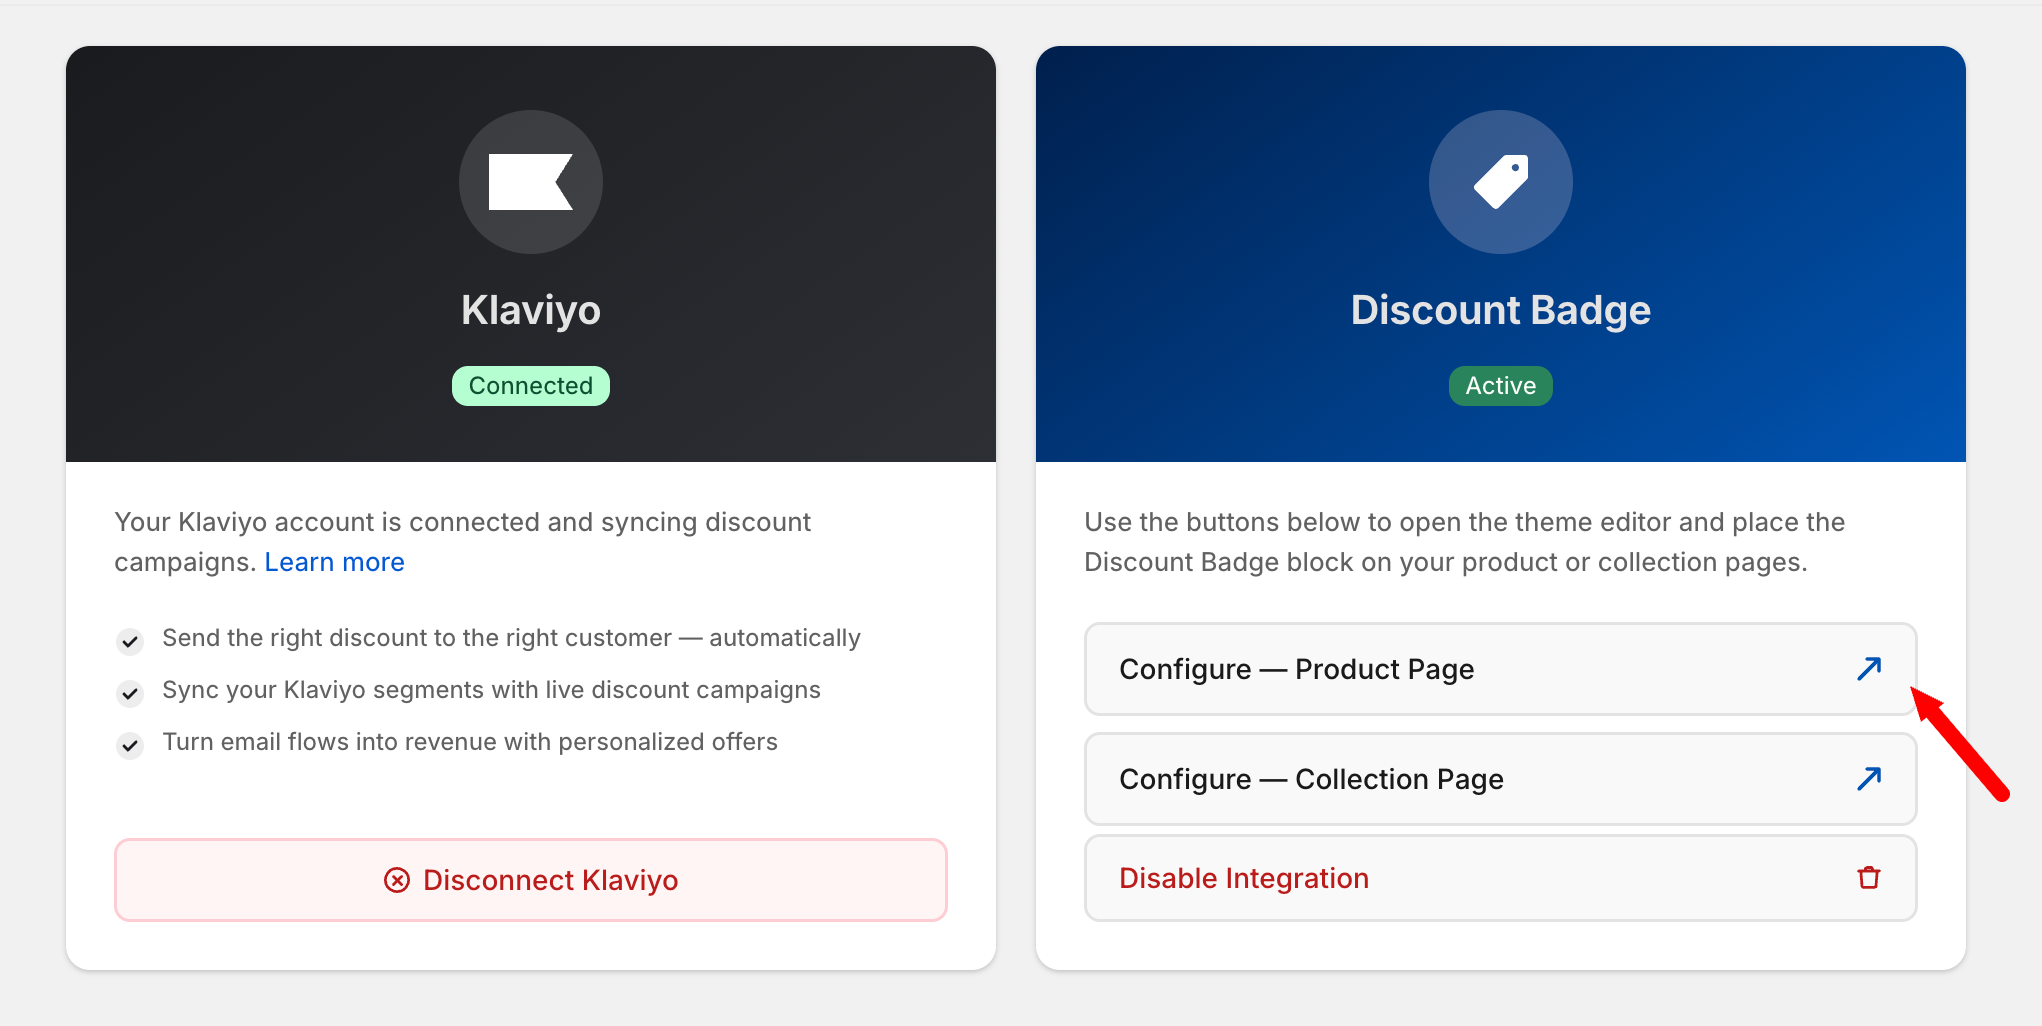
The Discount Badge feature lets you display live discount information directly on your storefront — on product pages, collection pages, or both. There is no coding required. CodeRally writes discount data to Shopify metafields automatically when you run a campaign, and the badge blocks read and render that data in real time.
What the Discount Badge does
Both blocks are installed as Shopify theme app extensions. They live inside your theme's editor, so you can position them anywhere on the page without touching code. The two blocks are:
The Discount Badge requires two additional Shopify permissions before it can run on your storefront:
These are one-time permissions you grant through Shopify's standard access prompt.
Once access is granted you do not need to repeat this step — the permissions persist across sessions and app updates.
Why these permissions?
CodeRally never modifies your products or theme files — the product write access is used exclusively to write and update metafield values, and the theme read access is used only to check whether the badge block is placed. No content, pricing, or settings are changed.
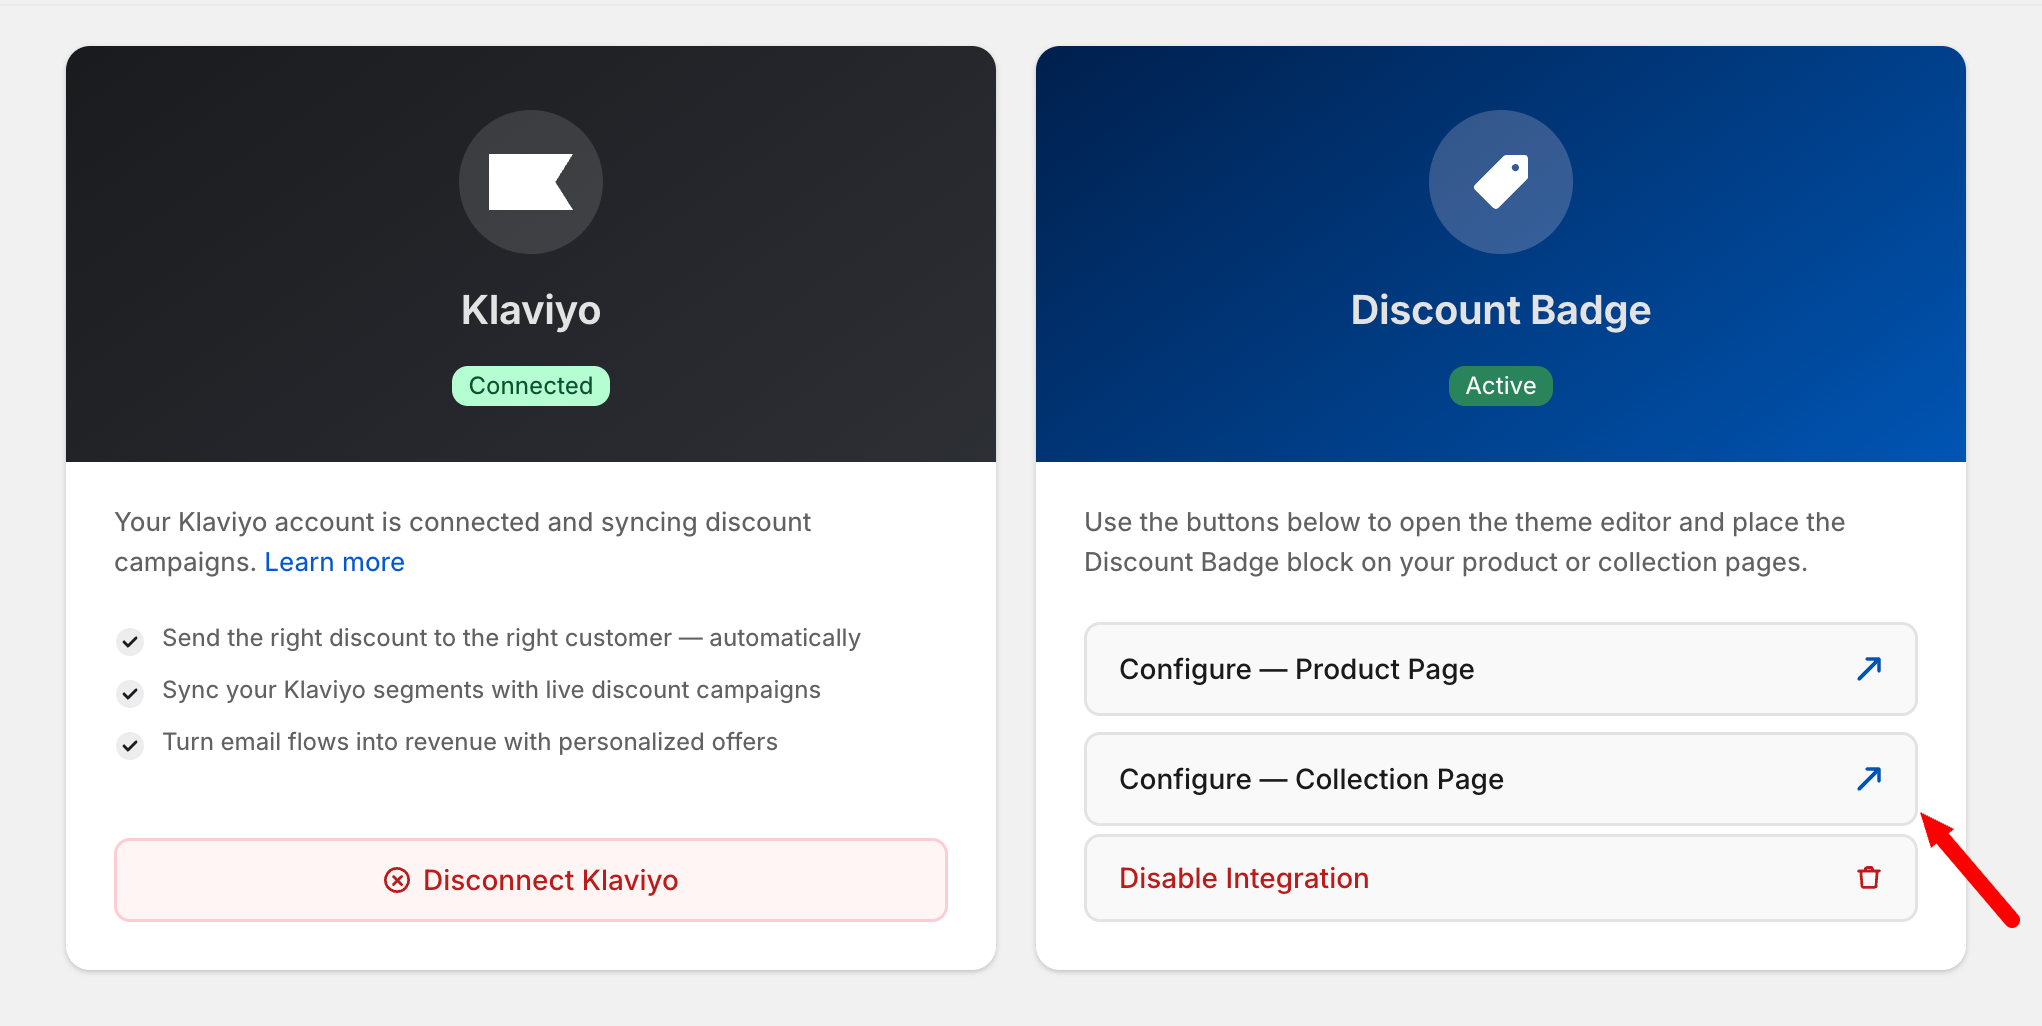
Before the badges appear on your storefront you need to place each block in your theme using the Shopify theme editor. CodeRally makes this a single click.
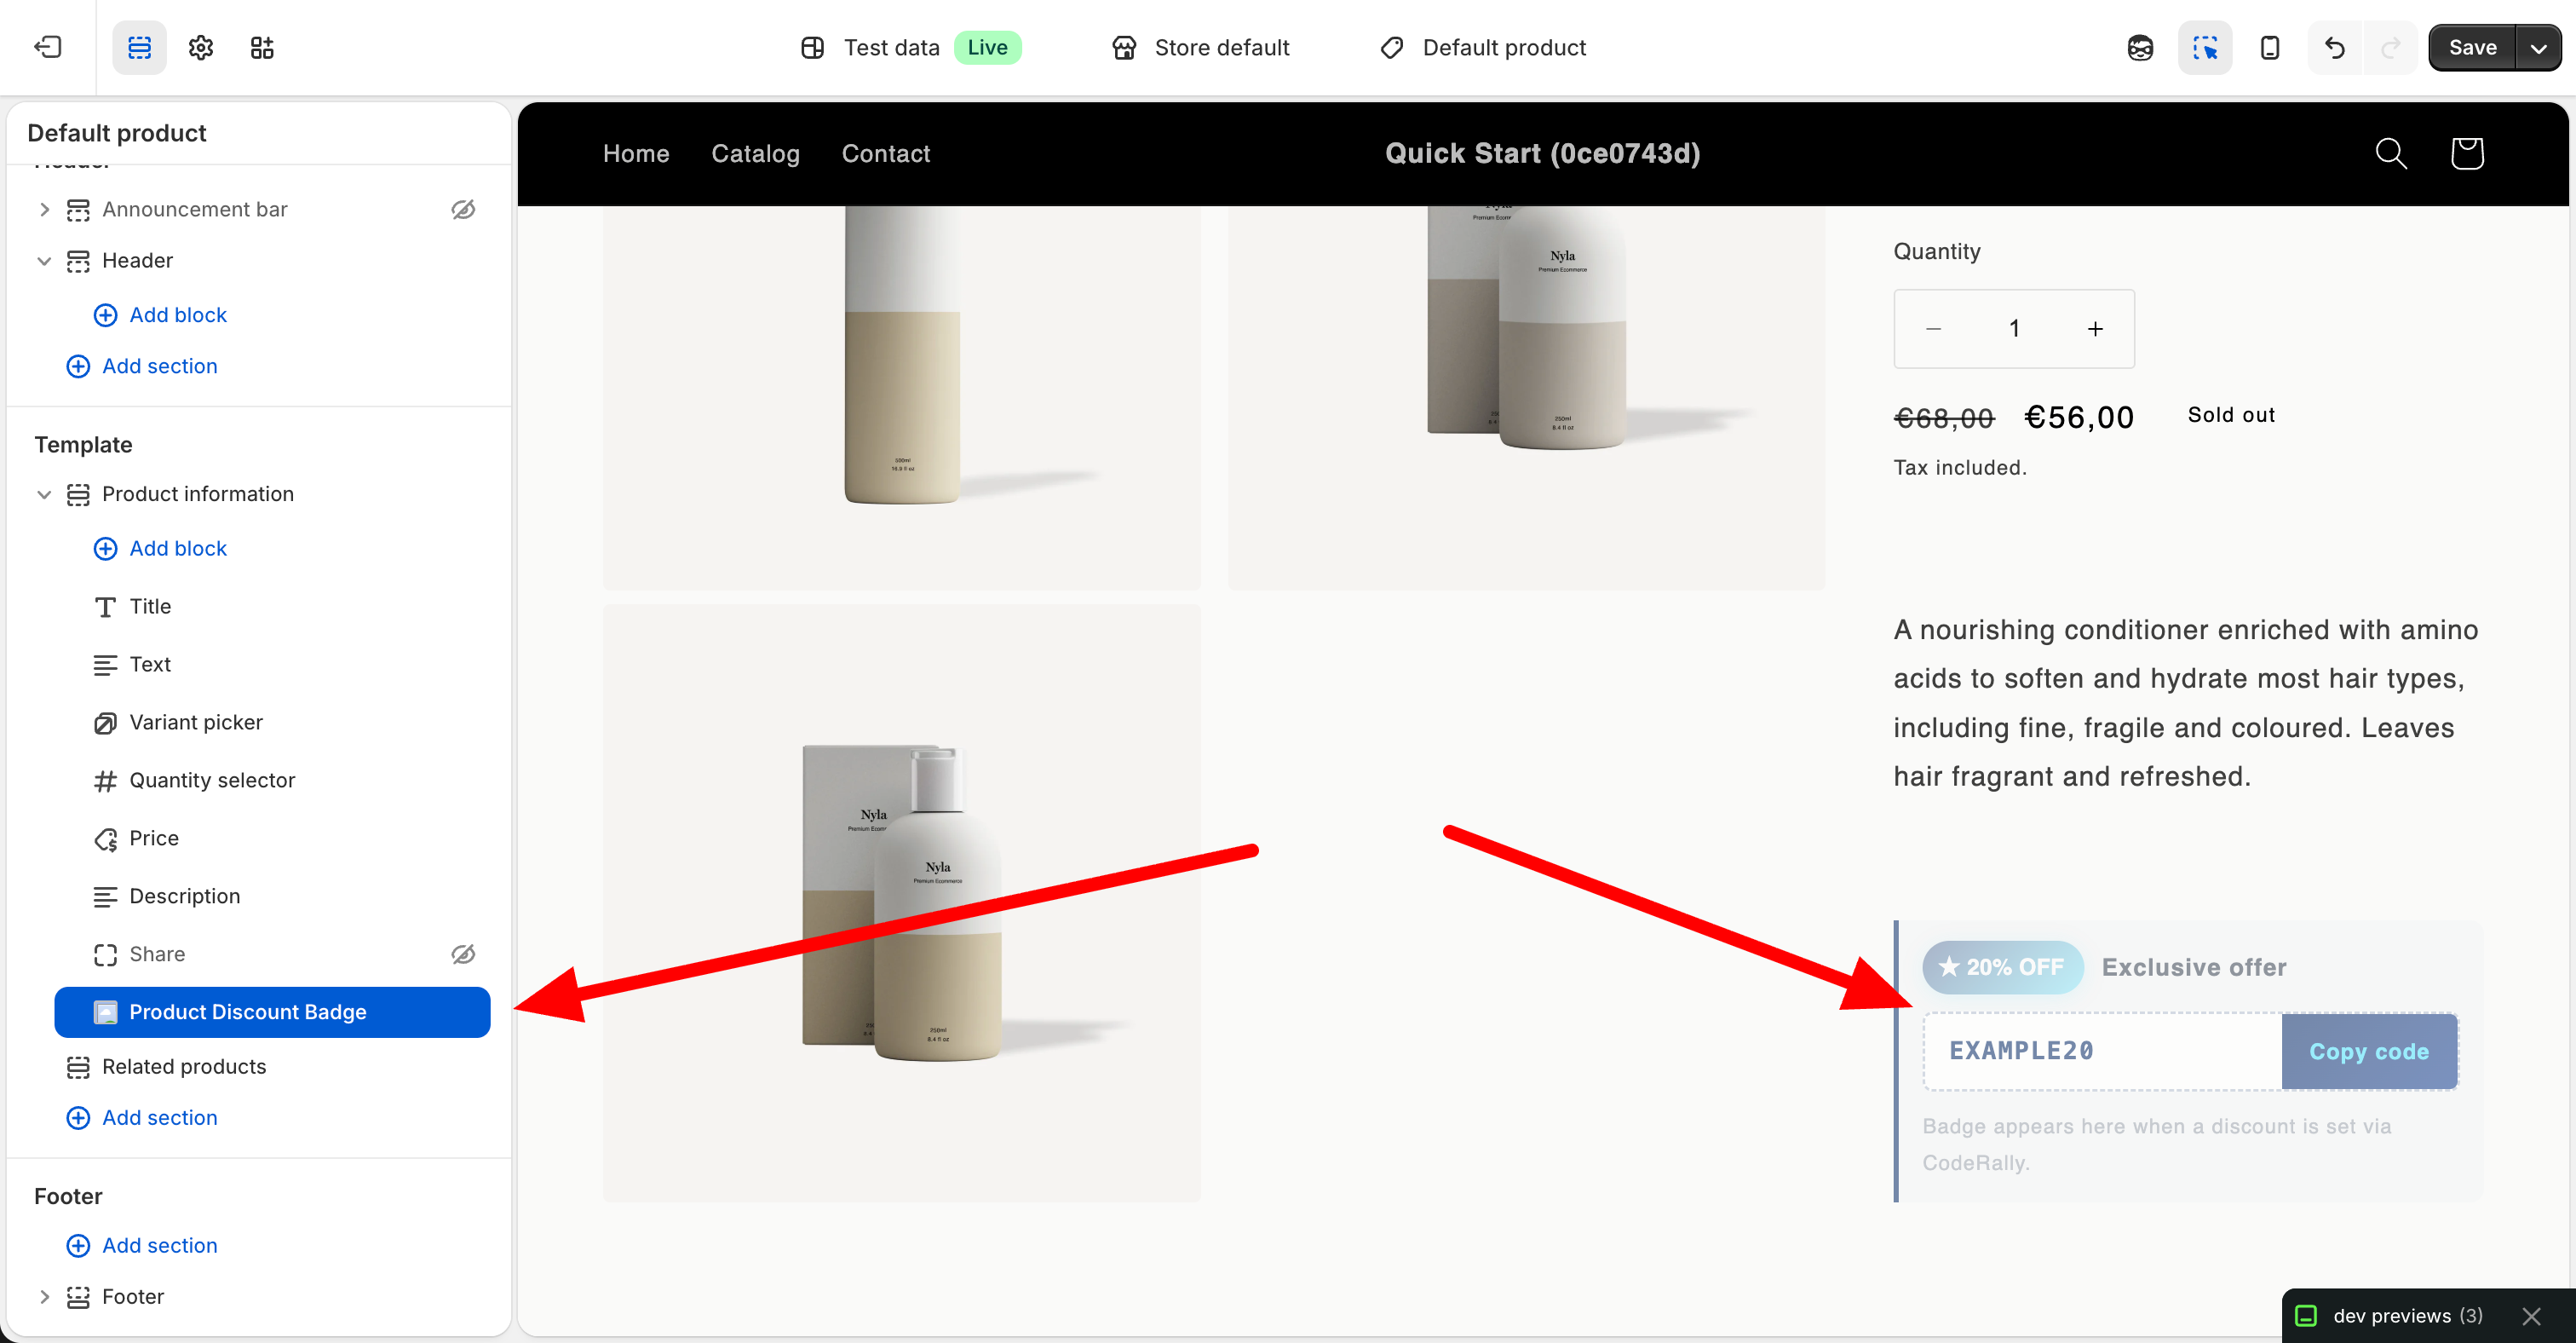
Tip: In the Shopify theme editor, a placeholder is always shown so you can position the block even when no discount is currently active. The badge will only appear on the live storefront once a discount is running.
The Product Discount Badge block (discount-badge.liquid) reads the app.coderally_discount_info product metafield that CodeRally writes when a discount is applied to a product. It renders a styled offer strip directly on the product page.
┌────────────────────────────────────────┐
│ ★ 23% OFF   Exclusive offer            │
│ Discount applies in cart / at checkout.│
└────────────────────────────────────────┘
The hint line is shown automatically for automatic discounts so shoppers know where the saving appears.
┌─────────────────────────────────────────────┐
│ ★ 23% OFF   Exclusive offer                 │
│ ┌──────────────────┬──────────────────────┐ │
│ │  SAVE23          │  Copy code           │ │
│ └──────────────────┴──────────────────────┘ │
└─────────────────────────────────────────────┘
Clicking Copy code writes the code to the clipboard and briefly changes the label to ✓ Copied!
| Setting | Type | Default | What it does |
|---|---|---|---|
| Show all discounts | Checkbox | Off | When on, stacks every active discount on the product. When off, shows only the primary (first) discount. |
| Delay code reveal | Checkbox | Off | Hides the entire badge until the timer expires, then reveals with a fade-in animation. |
| Reveal delay | Range (10 – 300 s) | 60 s | How many seconds to wait before revealing the badge. |
| Use custom HTML | Checkbox | Off | Replaces the built-in badge entirely with your own HTML and CSS markup. |
| Custom HTML / CSS | Textarea | — | Paste your own markup here. Tokens and conditional blocks are replaced at runtime by an inline script. |
Tokens are placeholders in your custom HTML that are replaced with live discount data when the page loads. They only work in custom HTML mode.
| Token | Replaced with | Example output |
|---|---|---|
[discount_percentage] |
Integer percentage value | 23 |
[discount_code] |
Discount code string (empty string for automatic discounts) | SAVE23 |
[discount_type] |
Type of discount | automatic or code |
[product_title] |
Product title | Classic Tee |
[product_vendor] |
Brand / vendor name | Acme Co |
Conditional blocks let you show different markup depending on whether the discount is a code or automatic. They are resolved after token substitution, so you can freely nest tokens inside them.
| Tag | Renders when |
|---|---|
[if_code]...[/if_code] |
A discount code exists |
[if_auto]...[/if_auto] |
The discount is automatic (no code) |
[if_code]
<p>Use code <strong>[discount_code]</strong> at checkout.</p>
[/if_code]
[if_auto]
<p>Discount applies automatically in cart / at checkout.</p>
[/if_auto]To enable clipboard copy in custom HTML, add class="cr-copy-custom" to any <button> element inside your markup. The built-in script automatically reads [discount_code] as the text to copy and temporarily changes the button label to ✓ Copied! for 2 seconds. No extra JavaScript is needed.
<button class="cr-copy-custom" style="...">Copy code</button>Wrap the copy button inside [if_code]...[/if_code] so it only appears for code discounts, not automatic ones.
When Delay code reveal is turned on, the entire badge is hidden until the countdown timer expires. It then appears with a smooth fade-in animation. This is useful for creating urgency — for example, showing a discount code only after a shopper has spent some time on the page.
If a product has more than one active discount, the Show all discounts setting controls whether all of them are displayed or only the primary (first) one.
| Setting | Behaviour |
|---|---|
| Off (default) | Only the first (primary) discount is shown |
| On | Every active discount is stacked, each rendered with its own token values |
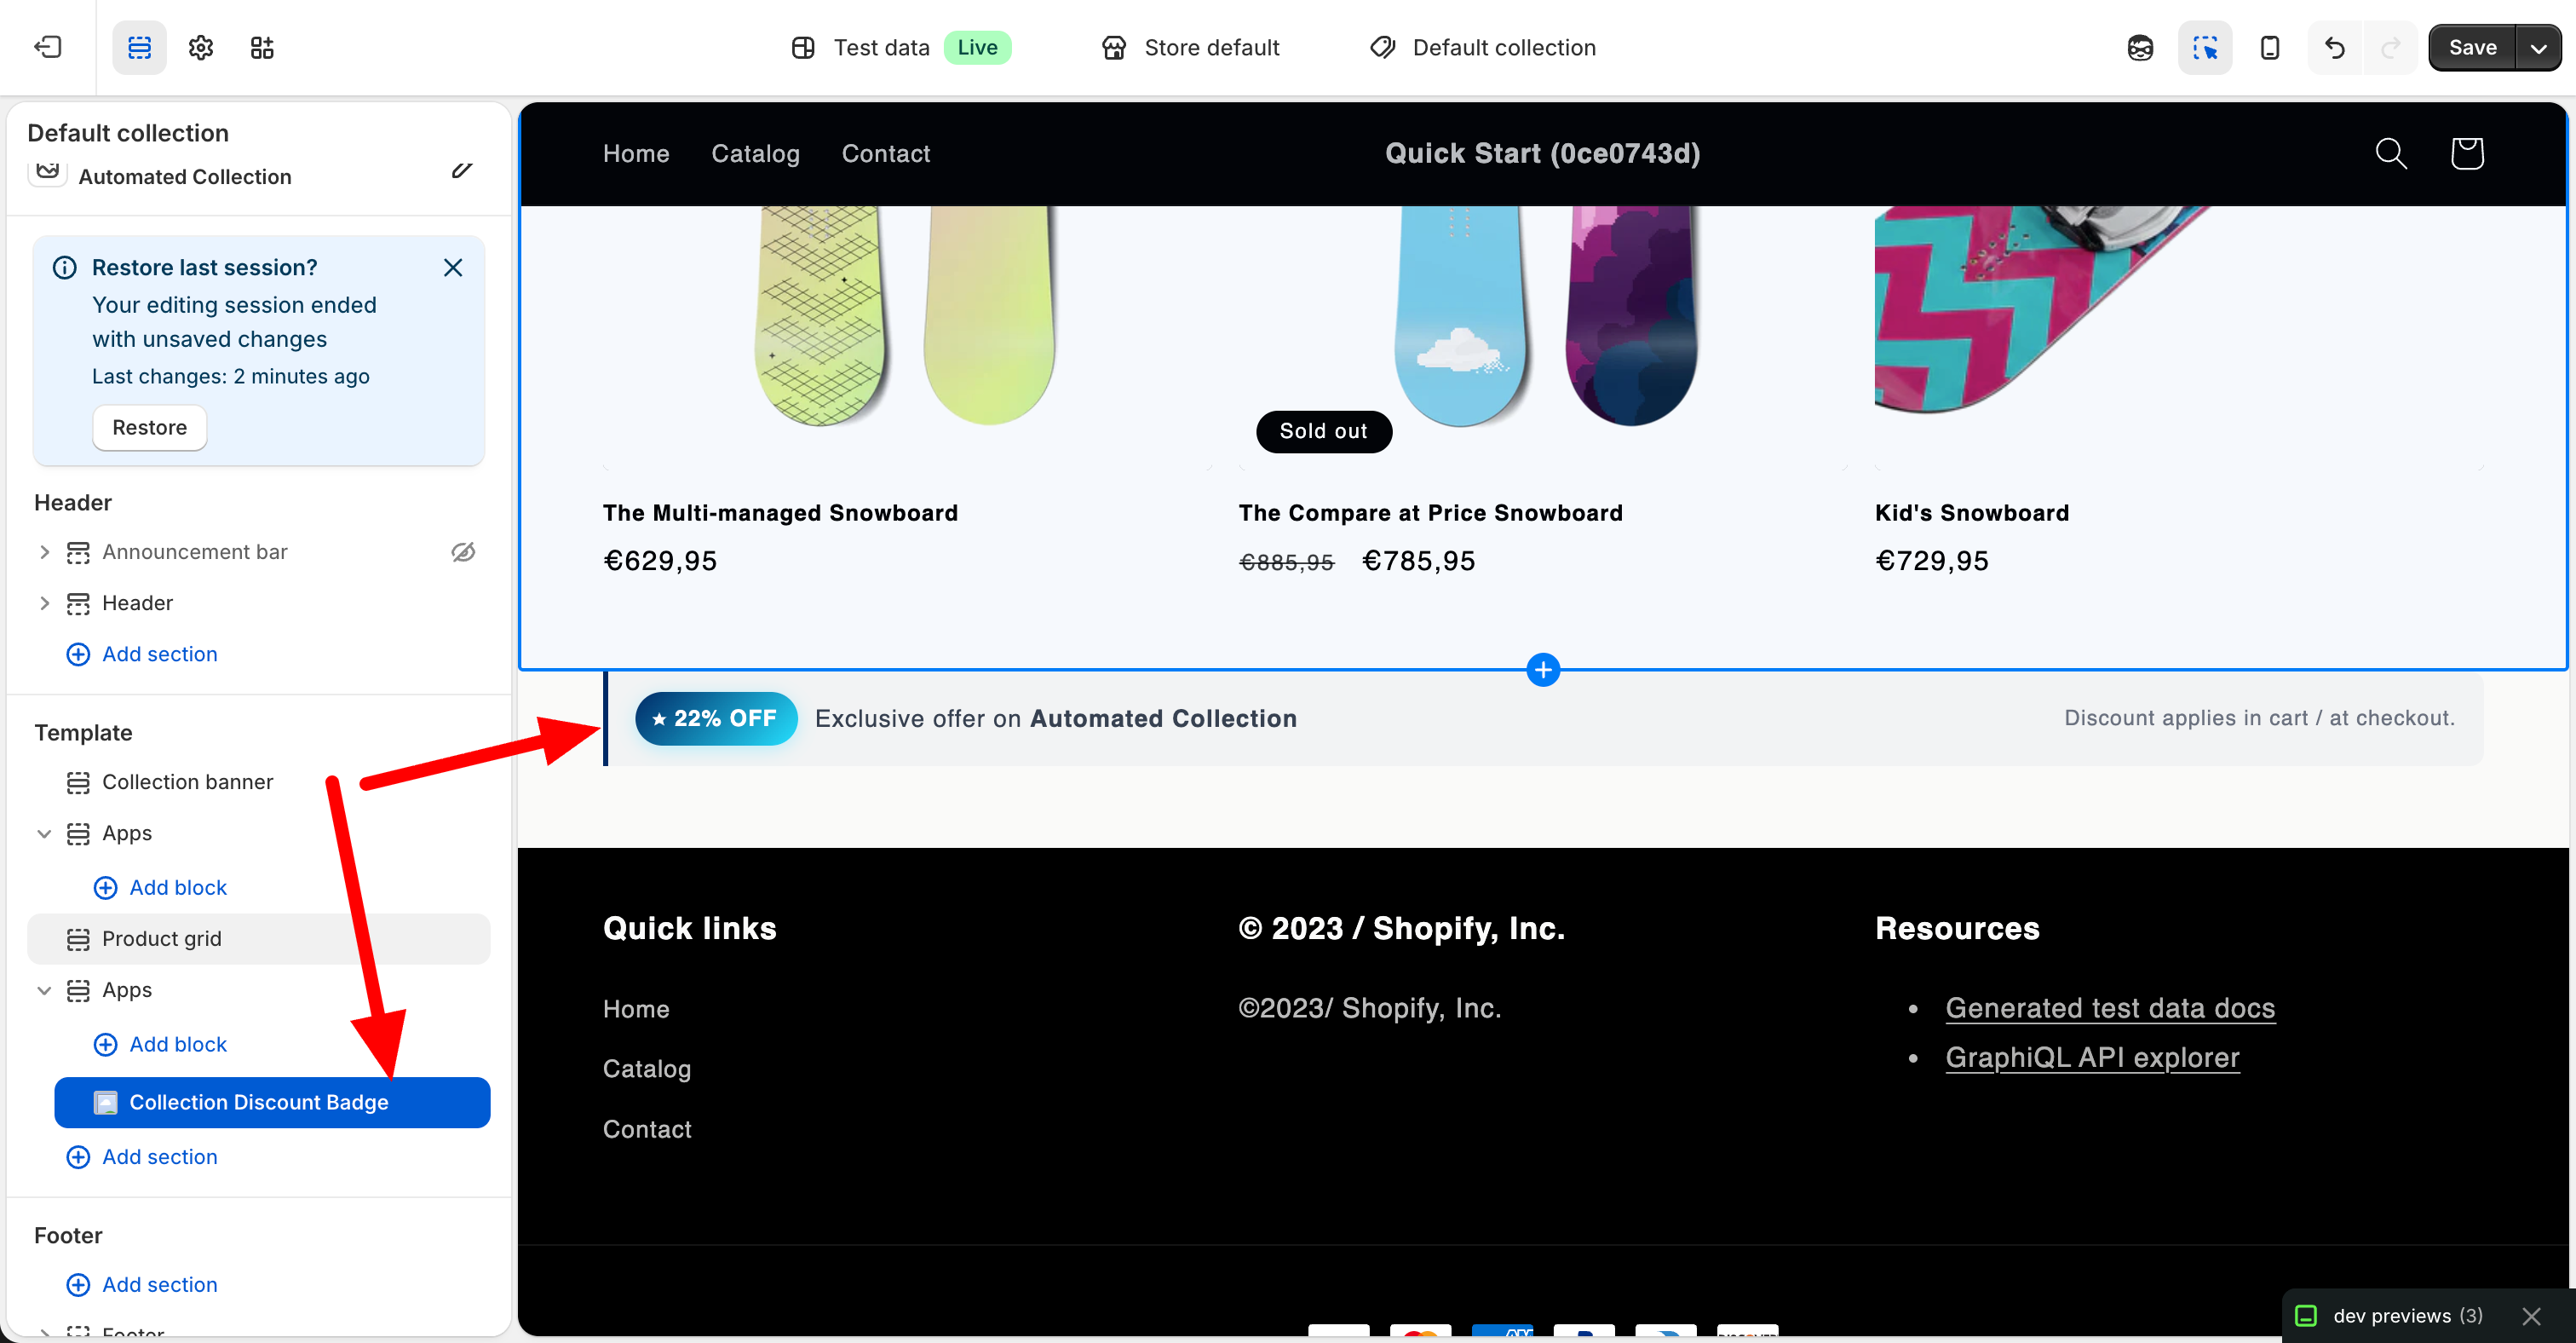
The Collection Discount Badge block (collection-badge.liquid) reads the app.coderally_discount_info collection metafield. It renders a deal element on the collection page so shoppers see the offer before they browse individual products.
Unlike the product block, the collection block offers two built-in display styles selectable from the theme editor:
A horizontal bar with the discount badge on the left and the code chip on the right. Good for placement in sidebars or above tight product grids.
┌──────────────────────────────────────────────────────┐
│ ★ 25% OFF   Exclusive offer on Summer Collection     │
│                   ┌──────────────┬──────────────────┐│
│                   │  SUMMER25    │  Copy code       ││
│                   └──────────────┴──────────────────┘│
└──────────────────────────────────────────────────────┘A full-width dark gradient card with a large percentage number. This is the recommended style for collection pages — the visual weight communicates a category-level deal clearly and immediately.
┌──────────────────────────────────────────────────────────────┐
│  EXCLUSIVE COLLECTION DEAL                                   │
│                                                              │
│   25   %    On everything in Summer Collection               │
│      OFF                [ SUMMER25 ] [ Copy code ]           │
└──────────────────────────────────────────────────────────────┘
The percentage is rendered in brand cyan (#25E0FF) against a dark blue gradient. On smaller screens the layout wraps vertically.
| Setting | Type | Default | What it does |
|---|---|---|---|
| Display style | Select | Strip | Strip (compact) or Banner (full-width). Banner is recommended. |
| Banner headline | Text | Exclusive Collection Deal | Short label shown above the collection name in Banner mode. Customise to match your campaign. |
| Show all discounts | Checkbox | Off | Stacks every active collection discount when on; shows only the first when off. |
| Delay code reveal | Checkbox | Off | Masks the discount code behind a live countdown. The badge is visible immediately; only the code is hidden. |
| Reveal delay | Range (10 – 300 s) | 60 s | Seconds until the code is revealed. |
| Use custom HTML | Checkbox | Off | Replaces the entire built-in UI with your own HTML markup. |
| Custom HTML / CSS | Textarea | — | Your custom markup. Tokens and conditionals are replaced at runtime. |
The collection block supports all the same tokens as the product block, plus a few collection-specific ones:
| Token | Replaced with | Example output |
|---|---|---|
[discount_percentage] |
Integer percentage value | 25 |
[discount_code] |
Discount code (empty for automatic) | SUMMER25 |
[discount_type] |
Type of discount | automatic or code |
[collection_title] |
Collection title | Summer Collection |
[collection_description] |
Collection description (first 120 chars, HTML stripped) | Our best summer styles... |
[product_count] |
Number of products in the collection | 142 |
[product_title] |
Alias for [collection_title] — kept for compatibility |
Summer Collection |
Identical to the product block — use [if_code]...[/if_code] and [if_auto]...[/if_auto]. See Section 4.4 for details.
Works identically to the product block. Add class="cr-copy-custom" to any <button> in your custom markup. No extra JavaScript needed. See Section 4.5.
The collection block's delayed reveal behaves slightly differently from the product block:
•••••••• with a live countdown buttonWhen Show all discounts is on, every active discount is stacked using the chosen Strip or Banner style. In custom HTML mode, only the first (primary) discount is rendered regardless of this setting.
These ready-to-paste examples work in both the product and collection blocks (using their respective tokens). Paste them into the Custom HTML / CSS textarea after enabling Use custom HTML.
Mirrors the built-in badge style but in fully custom markup. Safe to use when a product may have both automatic and code discounts.
<div style="border-left:3px solid #002A66;background:rgba(0,42,102,0.03);border-radius:0 8px 8px 0;padding:12px 14px;display:flex;flex-direction:column;gap:10px;">
  <div style="display:flex;align-items:center;gap:10px;">
    <span style="background:linear-gradient(135deg,#002A66,#25E0FF);color:#fff;font-weight:700;font-size:0.82em;padding:4px 12px;border-radius:20px;">
      ★ [discount_percentage]% OFF
    </span>
    <span style="font-size:0.88em;font-weight:600;color:#374151;">Exclusive offer</span>
  </div>
  [if_code]
  <div style="display:flex;border:1.5px dashed rgba(0,42,102,0.3);border-radius:6px;overflow:hidden;background:#fff;">
    <span style="flex:1;padding:9px 14px;font-family:monospace;font-weight:700;color:#002A66;letter-spacing:0.06em;">[discount_code]</span>
    <button class="cr-copy-custom" style="padding:9px 16px;background:linear-gradient(135deg,#002A66,#0a3d8f);color:#25E0FF;border:none;cursor:pointer;font-weight:700;font-size:0.8em;">Copy</button>
  </div>
  [/if_code]
  [if_auto]
  <p style="margin:0;font-size:0.78em;color:#6b7280;">Discount applies automatically in cart / at checkout.</p>
  [/if_auto]
</div>Minimal one-line banner for themes with tight product layouts.
<div style="background:#002A66;color:#fff;text-align:center;padding:10px 16px;font-size:0.88em;font-weight:600;border-radius:6px;">
  🎉 [discount_percentage]% OFF
  [if_code] — use code <strong>[discount_code]</strong>[/if_code]
  [if_auto] — applied automatically at checkout[/if_auto]
</div>Distinct visual treatment per type — ideal when both automatic and code discounts are used in the same store.
[if_auto]
<div style="background:#f0fdf4;border:1px solid #bbf7d0;border-radius:8px;padding:12px 16px;">
  <p style="margin:0 0 4px;font-weight:700;color:#166534;font-size:0.9em;">★ [discount_percentage]% OFF — applied automatically</p>
  <p style="margin:0;font-size:0.78em;color:#4b7a5e;">No code needed. Discount applies in cart / at checkout.</p>
</div>
[/if_auto]
[if_code]
<div style="background:#eff6ff;border:1px solid #bfdbfe;border-radius:8px;padding:12px 16px;display:flex;flex-direction:column;gap:8px;">
  <p style="margin:0;font-weight:700;color:#1e40af;font-size:0.9em;">★ [discount_percentage]% OFF — use your code at checkout</p>
  <div style="display:flex;border:1.5px dashed #93c5fd;border-radius:6px;overflow:hidden;background:#fff;">
    <span style="flex:1;padding:9px 14px;font-family:monospace;font-weight:700;color:#1e40af;letter-spacing:0.06em;">[discount_code]</span>
    <button class="cr-copy-custom" style="padding:9px 16px;background:#1e40af;color:#fff;border:none;cursor:pointer;font-weight:700;font-size:0.8em;">Copy</button>
  </div>
</div>
[/if_code]Takes advantage of the [product_count] and [collection_title] tokens that are unique to the collection block.
<div style="background:linear-gradient(135deg,#002A66,#0a3d8f);border-radius:12px;padding:20px 24px;color:#fff;display:flex;align-items:center;gap:20px;flex-wrap:wrap;">
  <div style="display:flex;align-items:baseline;gap:3px;flex-shrink:0;">
    <span style="font-size:3em;font-weight:900;color:#25E0FF;line-height:1;">[discount_percentage]</span>
    <span style="font-size:1em;font-weight:700;color:rgba(255,255,255,0.75);">%<br>OFF</span>
  </div>
  <div style="flex:1;min-width:160px;">
    <p style="margin:0 0 3px;font-size:0.68em;font-weight:700;letter-spacing:0.1em;text-transform:uppercase;color:#25E0FF;">Exclusive Collection Deal</p>
    <p style="margin:0;font-size:0.96em;color:rgba(255,255,255,0.9);">On all [product_count] products in <strong>[collection_title]</strong></p>
  </div>
  [if_code]
  <div style="display:flex;border:1.5px dashed rgba(255,255,255,0.35);border-radius:6px;overflow:hidden;background:rgba(255,255,255,0.08);flex-shrink:0;">
    <span style="padding:9px 14px;font-family:monospace;font-size:0.9em;font-weight:700;color:#fff;letter-spacing:0.06em;">[discount_code]</span>
    <button class="cr-copy-custom" style="padding:9px 16px;background:#25E0FF;color:#002A66;border:none;cursor:pointer;font-weight:700;font-size:0.8em;">Copy</button>
  </div>
  [/if_code]
  [if_auto]
  <p style="margin:0;font-size:0.82em;color:rgba(255,255,255,0.7);flex-shrink:0;">Applied automatically at checkout.</p>
  [/if_auto]
</div>| Feature | Product block | Collection block |
|---|---|---|
| Block name in theme editor | Product Discount Badge | Collection Discount Badge |
| Page scope | Product pages only | Collection pages only |
| Built-in display styles | Vertical strip only | Strip or full-width Banner |
| Delayed reveal behaviour | Entire badge is hidden until timer expires | Badge always visible; only the code is masked with a countdown |
| Delayed reveal in custom HTML | Applied (badge hidden) | Not applied (renders immediately) |
[product_vendor] |
✓ Yes | ✗ No |
[collection_title] |
✗ No | ✓ Yes |
[collection_description] |
✗ No | ✓ Yes |
[product_count] |
✗ No | ✓ Yes |
| Custom HTML — multi-discount | Each discount gets its own token context | First discount only |
cr- to avoid collisions with your theme's existing stylesapp, key coderally_discount_info, type json, with PUBLIC_READ storefront access — this is set automatically by CodeRallyFor technical assistance:
Last Updated: April 2026
Version: 1.0
Discover strategies and tools to increase sales, speed, and customer engagement.